| Printers |
Printer problem solutions
Topic status automatically displays here - do not remove.
 Bookmark this topic
 Print this topic
This topic lists some of the problems found when printing, and discusses workarounds and solutions:
Changing default printer settings
If the out-of-the-box default settings for your printer don't match
your requirements—for example, if the printer's default paper size is
'Letter' and you want to use 'A4' instead, or the default quality setting
is 'Standard' and you wish to always print in 'High' quality from this
printer—you can change these default settings using the Windows 'Printer
Properties' dialog.
See
 how to change the default property
settings of your printer.
how to change the default property
settings of your printer.
 Note
Note
The following example demonstrates how to alter the default properties of the Canon BubbleJet i865 colour printer. Don't be overly concerned if you don't have this particular brand or model, as the following procedures are similar for any printer connected to a Windows (2000 or later) operating system. You should select whichever available printer you wish to alter the default settings for.

To change the default property settings of your printer:
-
In Windows 2000 or earlier, select Start [ | Settings] |
Printers.
In Windows XP or later, select Start | Printers and Faxes.This will display the Printers list of all installed printers on this computer.
-
In the list of printers, double-click the printer name you wish to change the
default properties for.
This will launch and display the printer 'Properties' dialog:

-
Select the 'Advanced' tab and click the Printing Defaults
button.
This will launch and display the printer 'Printing Defaults' dialog:
 Note
Note
Changing any settings in this dialog will affect the default settings of this printer for all users of this computer. They can (of course) alter any settings for their individual print operations as required.
-
Select the 'Main' tab and in the 'Print Quality' section, select
High.
This will set the printer to print in high quality by default for all users of this printer on this computer.
 Tip
Tip
Should you wish to print at a lower quality for any individual print operation, adjust the quality setting in the print dialog for that particular print operation. That will not affect the printer's default settings (which can only be set here using the advanced 'Printer Defaults' dialog).
-
Select the 'Page Setup' tab, and in the 'Page Size' drop-down list,
select A4.
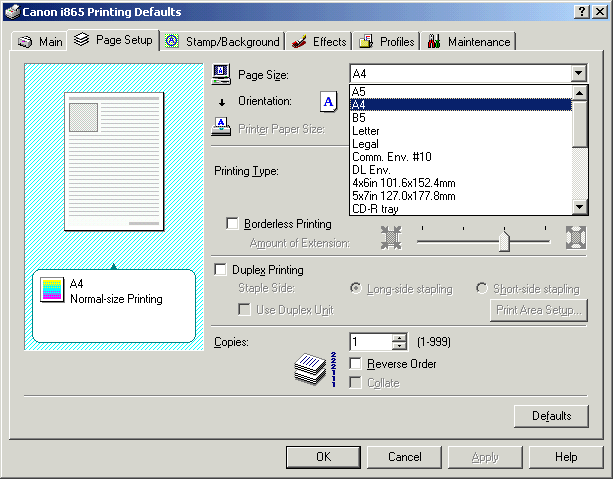
This will set the printer to expect A4 size paper by default for all users of this printer on this computer.
Tip
Should you wish to print to different paper stock in a particular print operation, adjust the page size setting in the print dialog for that particular print operation.
-
Make any other changes you require to the default settings,
then click OK to close the printer 'Printing Defaults' dialog,
and click OK to close the printer 'Properties' dialog.

MediaFACE 4.0 printer calibration settings
When printing Fellowes labels using their 'NEATO MediaFACE Design Software',
you may notice that the printed result does not exactly align with the
pre-cut edges of the labels (assuming you've selected the correct template
for that label). In cases like these (where there is only a small adjustment
required), you can adjust the printer calibration settings using the
'MediaFACE Calibration Wizard'.
See
how to calibrate your printer using
the MediaFACE calibration wizard.
To calibrate your printer using the MediaFACE calibration wizard:
-
In MediaFACE 4.0, either:
- Select File | Calibrate Printer; or
-
Click the Calibrate button on the 'Printer' section
of the print dialog window as highlighted below:
 Note
Note
This example demonstrates connection with a Canon BubbleJet i865 colour printer. Don't concern yourself about that as the calibration procedure is the same for every printer. You should select whichever available printer you wish to print your labels with.
-
The 'MediaFACE Calibration Wizard' will launch and display a request
for you to pick the type of paper you wish to use for printer calibration:
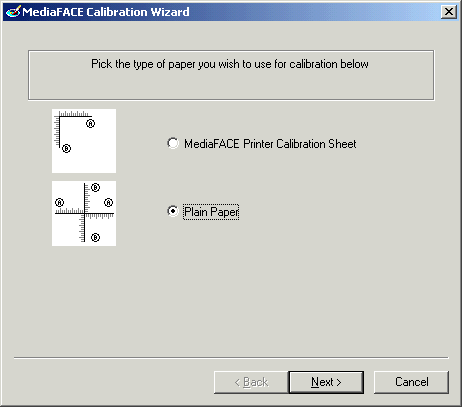
Unless you actually have a 'MediaFACE Printer Calibration Sheet' (which does not come with the Fellowes labels, nor with the MediaFACE Design Software), select the 'Plain Paper' option and click Next.
Note
This example demonstrates calibration using the 'Plain Paper' option. If you use the 'MediaFACE Printer Calibration Sheet' option, you'll have to follow the instructions which come with the MediaFACE Design Software.
-
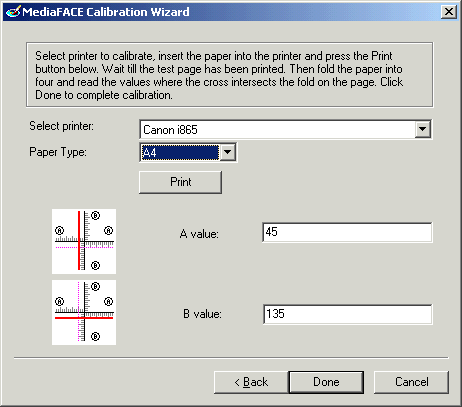
The wizard will instruct you to print a sample calibration page.
Select the correct printer and paper size from the drop-down lists,
load a blank plain sheet of the same size paper (not a template
sheet), and click the Print button located in the middle
of the dialog:
-
The resultant printout contains instructions at the top, and a cross
of scaled lines in the centre of the page. Follow the instructions
to fold the page into quarters to create fold crease marks on the
paper.
Unfold and examine the paper to compare the relationship between the print lines and the fold lines:
- Should they correspond exactlythat is, the centre of the cross formed from the print lines exactly overlays the centre of the cross formed by the fold linesthere is nothing further you need to do. The printer is suitably calibrated for label printing with the 'NEATO MediaFACE Design Software'.
- Should they not correspond exactlythat is, the centre of the cross formed from the print lines does not exactly overlay the centre of the cross formed by the fold linesyou will have to calibrate the printer alignment. If so, continue with this procedure.
-
Read the value off the horizontal 'A' printed line where the vertical
paper fold crosses the line and enter this value into the 'A value'
field in the calibration wizard dialog.
Read the value off the vertical 'B' printed line where the horizontal paper fold crosses the line and enter this value into the 'B value' field in the calibration wizard dialog.
 Caution
When printing in landscape mode—as is the case when printing CD or DVD case inserts—be careful to avoid the mistake of comparing the portrait test calibration printout with the landscape printed case insert.
Tip
For landscape printing alignment values, hold the portrait test calibration page face-up, and turn it 90 anti-clockwise (rotate the top to the left) as if you were reading it in portrait to determine the values for lines 'A' and 'B' to enter into the calibration wizard dialog.
-
Click Done. The calibration settings for this printer will
be saved and reused next time you select this printer using the
'NEATO MediaFACE Design Software'.
Note
The test calibration scaled lines will always print in the identical position on the page, no matter what the values for 'A' and 'B' are set to in the 'MediaFACE Calibration Wizard'.
See Also
 Lotech Solutions' Tips, Tricks,
and Procedures
Lotech Solutions' Tips, Tricks,
and Procedures
 email webmaster
Copyright Lotech Solutions. All rights reserved.